Getting started with MegEngine#
Note
This tutorial assumes that the reader has the most basic Python code programming experience and understands the basic concepts of “deep learning”;
Before proceeding with the following steps, please make sure that you have installed MegEngine as instructed on the How to install MegEngine page.
>>> import megengine
>>> print(megengine.__version__)
See also
本教程展示模型开发基本流程,对应源码: examples/quick-start.py
只关注模型部署流程的用户可以阅读 MegEngine 模型推理部署教程 🚀🚀🚀
Overview#
This quick-start tutorial will guide you through:1. Develop a classic LeNet neural network model using the MegEngine framework; 2. Use it to complete training and testing on the MNIST handwritten digits dataset; 3. Use the model for actual handwritten digit classification Task.
At the very beginning, we will have a basic understanding of the MNIST dataset, and try to use the data module in MegEngine to complete the acquisition and preprocessing of the MNIST dataset, and divide it into training datasets and test data. At the same time, you will also prepare the corresponding DataLoader, which is responsible for completing the data supply during subsequent training and testing of the model. Next you will design the LeNet model structure using functional and module modules. The next step is also very simple, train the model! During the training process, we need to use autodiff modules and optimizer modules, the former will record the gradient information during the training process, and the latter is responsible for updating the parameters in the model according to the gradient information, so as to achieve the purpose of optimization. Finally, we will test the trained model, and you can also use your own handwritten digit samples to try the effect~
Note:The purpose of this tutorial is to show the most basic usage process of the framework for first-time users of MegEngine, so it will not explain each step and the principle behind it in great detail, nor will it show all the features of MegEngine. If you are not very clear about the entire deep learning process, don’t worry, you can try to run through this tutorial, and there will be further instructions at the end.
Data loading and preprocessing#
Dataset introduction
MNIST [1] The handwritten digits dataset contains 60,000 training images and 10,000 testing images, each image is a 28x28 pixel grayscale image. Today MNIST has become the “Hello, world!” of machine learning, used to verify the availability of frameworks and libraries.
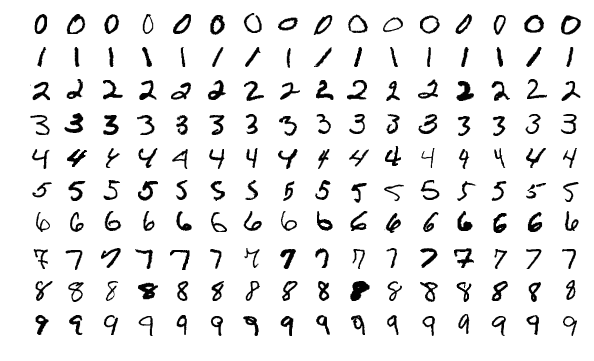
By Josef Steppan - Own work , CC BY-SA 4.0#
Get the MNIST dataset#
In MegEngine, you can Use the implemented data set interface to get the MNIST:
from megengine.data.dataset import MNIST

from os.path import expanduser
MNIST_DATA_PATH = expanduser("~/data/datasets/MNIST")

train_dataset = MNIST(MNIST_DATA_PATH, train=True)
test_dataset = MNIST(MNIST_DATA_PATH, train=False)
使用 MegEngine 下载 MNIST 数据集速度慢或总是失败
Calling the MNIST interface in MegEngine will download the dataset from the MNIST official website. MegEngine does not provide mirroring or acceleration services. Essentially it can be seen as running a separate MNIST dataset acquisition and processing script (you can also write your own script to do this).
MNIST dataset mirroring is provided in the `MegStudio <https://studio.brainpp.com/>platform, note:
Select the MNIST dataset when creating the project, set
MNIST_DATA_PATHto/home/megstudio/dataset/MNIST/;Set the
downloadparameter to `` :class:when calling the ~.MNIST interface to avoid downloading again.
Prepare DataLoader#
We input the training set and test set obtained in the previous step as parameters to DataLoader:
import megengine.data as data
import megengine.data.transform as T

train_sampler = data.RandomSampler(train_dataset, batch_size=64)
test_sampler = data.SequentialSampler(test_dataset, batch_size=4)

transform = T.Compose([
    T.Normalize(0.1307*255, 0.3081*255),
    T.Pad(2),
    T.ToMode("CHW"),
])

train_dataloader = data.DataLoader(train_dataset, train_sampler, transform)
test_dataloader = data.DataLoader(test_dataset, test_sampler, transform)
In the above code, we also define the sampling rules and preprocessing strategies of the data set. For example, we specify that the batch_size of the training set is 64, and the sampling method is random sampling… and the corresponding ` sampler` and transform are provided as initialization parameters to construct the DataLoader.
See also
For more details, see Use Data to build the input pipeline .
Define the model structure#
LeNet [2] The structure of the network model is shown in the figure below (the picture is taken from the paper):
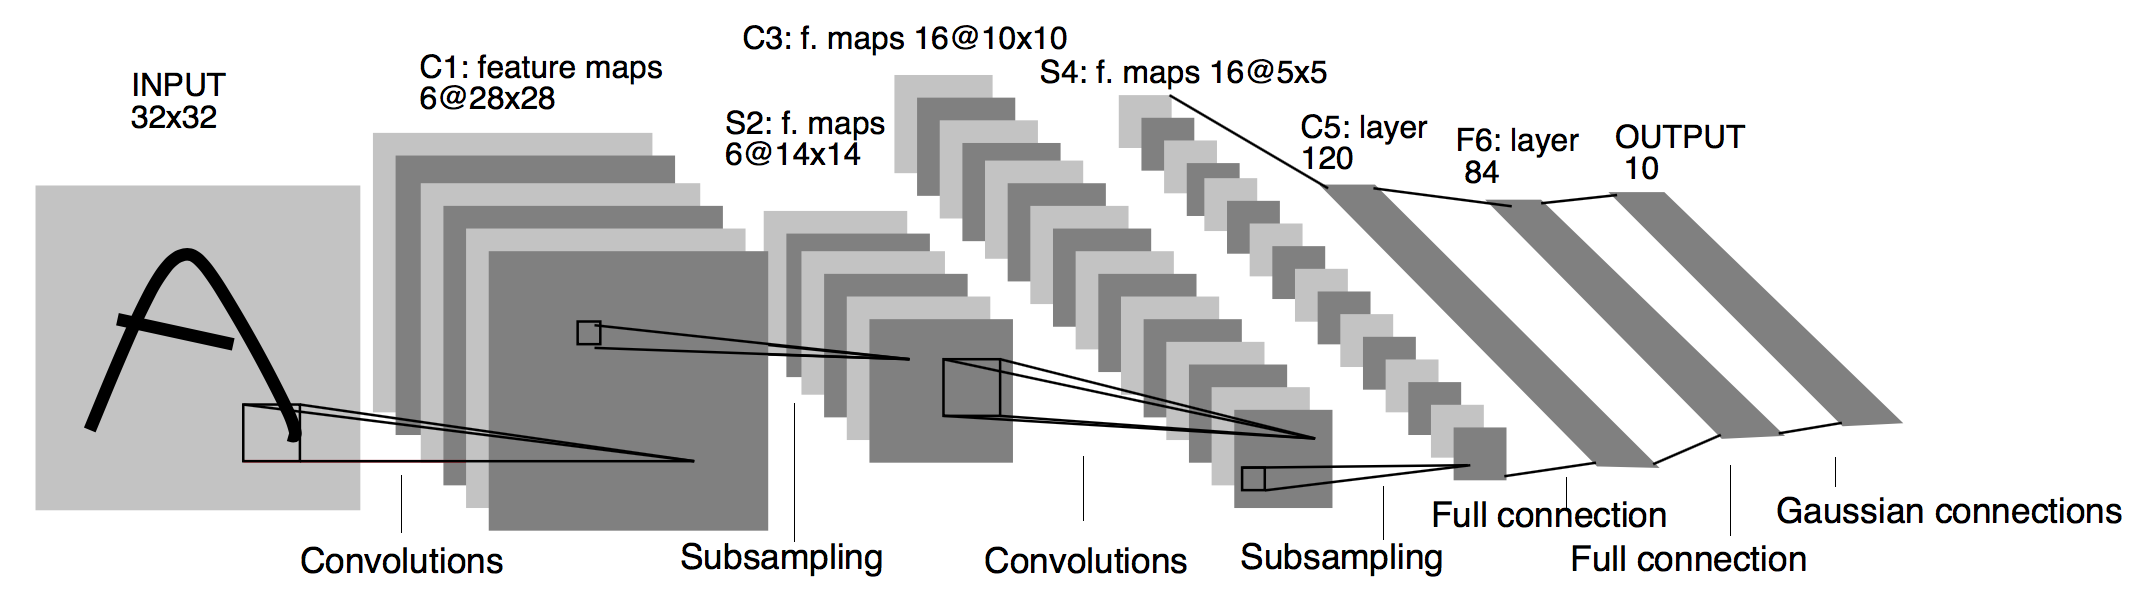
Architecture of LeNet a Convolutional Neural Network here for digits recognition. Each plane is a feature map ie a set of units whose weights are constrained to be identical.#
The most common way to define a network in MegEngine is to create a class that inherits from :class:`~:
import megengine.functional as F
import megengine.module as M

class LeNet(M.Module):
    def __init__(self):
        super().__init__()
        self.conv1 = M.Conv2d(1, 6, 5)
        self.conv2 = M.Conv2d(6, 16, 5)
        self.fc1 = M.Linear(16 * 5 * 5, 120)
        self.fc2 = M.Linear(120, 84)
        self.classifier = M.Linear(84, 10)

        self.relu = M.ReLU()
        self.pool = M.MaxPool2d(2, 2)

    def forward(self, x):
        x = self.pool(self.relu(self.conv1(x)))
        x = self.pool(self.relu(self.conv2(x)))
        x = F.flatten(x, 1)
        x = self.relu(self.fc1(x))
        x = self.relu(self.fc2(x))
        x = self.classifier(x)
        return x


model = LeNet()
super().__init__needs to be called in the__init__method;The structure to be used needs to be defined in the
__init__method, and the forward calculation process is defined in theforward.
See also
For more details, see Use Module to define the model structure .
Train:to optimize model parameters#
得到前向计算输出后,为了优化模型参数,我们还需要:
使用
GradManager对参数梯度进行管理;使用
Optimizer进行反向传播和参数更新(以SGD为例)。
import megengine.optimizer as optim
import megengine.autodiff as autodiff

gm = autodiff.GradManager().attach(model.parameters())
optimizer = optim.SGD(
    model.parameters(),
    lr=0.01,
    momentum=0.9,
    weight_decay=5e-4
)
接下来训练我们的模型:将训练数据集分批地喂入模型,前向计算得到预测值,
根据设计好的损失函数(本教程中使用交叉熵 cross_entropy )计算。
接着调用 GradManager.backward 方法来自动进行反向计算并记录梯度信息,
然后根据这些梯度信息来更新模型中的参数,即调用 Optimizer.step 方法。
import megengine


epochs = 10
model.train()
for epoch in range(epochs):
    total_loss = 0
    for batch_data, batch_label in train_dataloader:
        batch_data = megengine.Tensor(batch_data)
        batch_label = megengine.Tensor(batch_label)

        with gm:
            logits = model(batch_data)
            loss = F.nn.cross_entropy(logits, batch_label)
            gm.backward(loss)
            optimizer.step().clear_grad()

        total_loss += loss.item()

    print(f"Epoch: {epoch}, loss: {total_loss/len(train_dataset)}")
Warning
Remember to convert the data to MegEngine Tensor format, refer to Deep understanding of Tensor data structure.
See also
For more details, see Basic principles and use of Autodiff / Use Optimizer to optimize parameters .
Test:evaluates model performance#
Verify the performance of the LeNet model we just trained on the test set:
model.eval()
correct, total = 0, 0
for batch_data, batch_label in test_dataloader:
    batch_data = megengine.Tensor(batch_data)
    batch_label = megengine.Tensor(batch_label)

    logits = model(batch_data)
    pred = F.argmax(logits, axis=1)
    correct += (pred == batch_label).sum().item()
    total += len(pred)

print(f"Correct: {correct}, total: {total}, accuracy: {float(correct)/total}")
Usually you get a model that is close to or exceeds 99% prediction accuracy on the test set.
注:通常的训练流程中应当使用验证集,每训练一段时间就及时验证,这里简化了这一步。
推理:用单张图片验证#
We can also choose to use our own handwritten digital pictures to verify the model effect (you can choose to use your own pictures):

import cv2
import numpy as np

def process(image):
    image = cv2.cvtColor(image, cv2.COLOR_BGR2GRAY)
    image = cv2.resize(image, (32, 32))
    image = np.array(255 - image)
    return image

image = cv2.imread("/data/handwrittern-digit.png")
processed_image = process(image)
这里为什么需要进行预处理
Our trained model requires that the input image be a grayscale image (single channel) with a shape of 32x32, and the black and white background should correspond. For example, to convert black characters on a white background into white characters on a black background, the value of 255 will be calculated (because the representation range is [0, 255]).
The above are some necessary preprocessing steps for the input image sample, and then input it into the model for inference:
>>> logit = model(megengine.Tensor(processed_image).reshape(1, 1, 32, 32))
>>> pred = F.argmax(logit, axis=1).item()
>>> pred
6
It can be found that our trained LeNet model successfully predicts the label class of the handwritten digit picture as 6!
See also
这里展示的是最简单的模型推理情景,MegEngine 是一个训练推理一体化的框架, 能将训练好的模型导出,在 C++ 环境下高效地进行推理部署,可参考 Model Deployment Overview and Process Recommendations 中的介绍。
What to do next?#
We have successfully completed the handwritten digit classification task using the MegEngine framework, it is very simple~
There is more in the documentation
If you are still not very clear about the entire machine learning (deep learning) process, which makes it a little difficult to read this tutorial, don’t worry. We have prepared a more basic ” MegEngine Deep Learning Getting Started Tutorial” - it can be seen as a hands-on version of the current tutorial content, supplemented with more details and conceptual explanations. It will start with the basic concepts of machine learning, and help you understand the entire development process step by step. While exposed to more classic model structures, you will also learn more about how to use the MegEngine framework. Some usages like Save and Load Models (S&L) and Use Hub to publish and load pre-trained models will also be briefly introduced in this series of tutorials.
同时,由于这仅仅是一份快速上手教程,许多模型开发的进阶特性没有进行介绍,例如 Distributed Training / Quantization … 等专题,可以在 User’s Guide 中找到。 值得一提的是,MegEngine 不仅仅是一个深度学习训练框架,同时也支持便捷高效的模型推理部署。 关于模型推理部署的内容,可以参考 Model Deployment Overview and Process Recommendations 页面的介绍与 《 MegEngine 模型推理部署教程 》。
Anyone can become a contributor to the MegEngine tutorial
Due to some limitations brought by the developer’s perspective, we can’t write each piece of content in the document from the user’s perspective. Perfection is a long-term pursuit. If you have doubts or have any suggestions while reading the MegEngine tutorial, you are welcome to join the MegEngine documentation construction.
See the 如何为文档做贡献 page for more details.